

Tender, delicious, melt in your mouth and super easy to do, this Easy Braised Chicken Breast will have your family banging the table for more in minutes.
Tender Easy Braised Chicken Breast
Have you ever wondered how to make the most tender moist and flavorful chicken breast possible? Oh YES! Me TOO!
This past weekend a new friend showed me exactly what to do and I have to say, “Hats off sir, yours is just exactly right!”.
I’ve taken some liberties with his basic braised recipe and I asked some chef friends their opinion and amazingly, they all have about the same recipe.
I’ll show you mine and I’ll encourage you that you can do this in any oven safe pan like a dutch oven or heavy skillet or you can even accomplish similar results with a stove top pot with a tight fitting lid.
Here’s How You Do It
- Assemble your ingredients and use a meat hammer to flatten the thick end of the chicken breast so that the entire breast is about the same thickness.
- Season the meat
- Sear the meat
- Cook your onions down and then deglaze the pan if you aren’t using this same pan.
- Add everything to the oven safe dish, cover and set on the lowest temp your oven will achieve (for me that’s 170) for braised chicken breast.
- Check the temp every 30 mins.
Here’s What You’ll Need
- Chicken Breasts
- Seasoning
- Chicken Broth or a broth concentrate
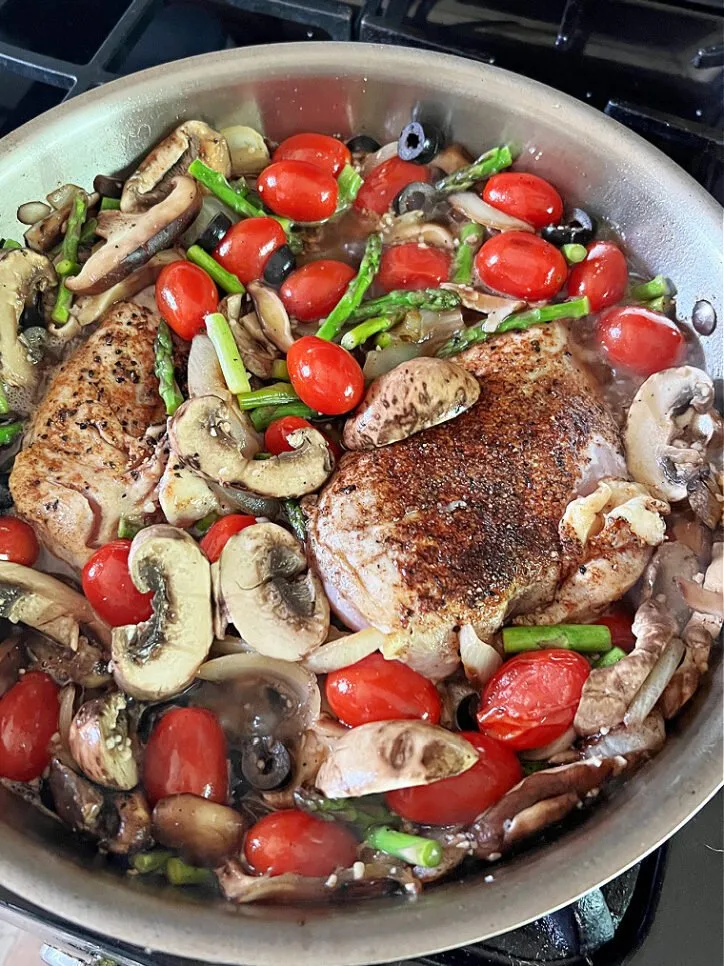
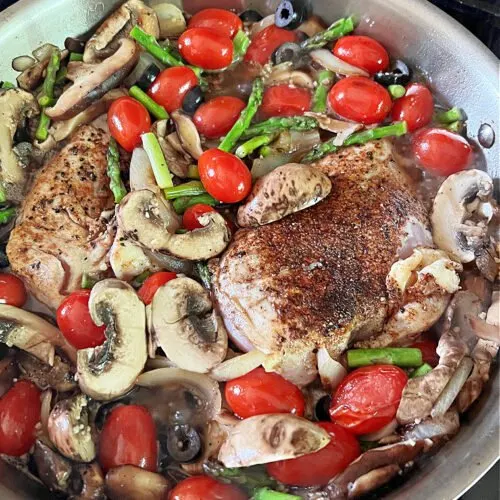
- Veggies like onions, olives, tomatoes or the vegetables you want seasoning your broth. (see the pic above? I used some asparagus that was going to waste!)
Special Equipment
If your kitchen is typically equipped, you won’t need anything special EXCEPT, you definitely need a good thermometer.
I ONLY recommend the Thermoworks thermometers that are available in all price points, but the Thermopen One is KING.

You’ll also need an oven safe lidded pot and a cast iron skillet with a tight fitting lid will work, a stainless steel lidded pot will work and a dutch oven will work. Here’s a great dutch oven that I have and like very much.
Click the photo to go straight over to Amazon where you can comparison shop. Any purchase made using this link will give me an affiliate commission and I am an Amazon affiliate. Thank you so much! Income made from these purchases directly supports the work at Loaves and Dishes!

I recommend a meat mallet or pounder, but you can also use a soup can. Here’s what a meat mallet is.

Frequently Asked Questions (FAQ’s)
Yes! You certainly can freeze any leftovers. Just remember that it’s easy to overheat during the reheat and that will cause the breast to dry out.
This will last about 5 days in the fridge if you keep it covered and refrigerated.
Substitutions
- Chicken Breast – You can substitute any cut of chicken for this dish but you may have to adjust your cooking time. Regardless, the chicken is done when an internal temp of 165 is reached. Check the thickest part of the chicken.
- Broth Concentrate – You can substitute chicken broth for the water and concentrate. Equal amounts.
- Olives – if you don’t like olives, just leave them out.
- Mushrooms – if you don’t like mushrooms, just leave them out. Feel free to substitute some other veggies like carrots or tomatoes which will give a whole different flavor.
- Onions – If you don’t like onions but don’t mind the flavor of onions, then leave them in, you don’t have to eat them but they do add a lot of flavor. If you don’t like the flavor of onions, leave them out but use more garlic instead.
- Garlic – What? You don’t like garlic? That’s so negative. JK. Leave it off if you don’t like it.
Tips and Tricks for Perfect Easy Braised Chicken Breast
- The very best tip is to make sure you are using a very good thermometer. The chicken is done when a thermometer placed in the center of the meat at the thickest part is reading 165. Remove from the heat, remove the lid and allow to rest for a few minutes.
- If you can find farm fresh, never frozen and not injected with saline chicken breasts, you’ll have the most amazing flavor that you can imagine.
- You can use any combination of vegetables that you prefer, just know that the veggies will mostly disintegrate. I like to just use onions, garlic and then add my own seasonings.
- This braised chicken will work for any cut of chicken (bone in or out) the most important part is that you watch the temp and when the chicken reaches the right internal temp, remove it from the heat.
- Add salt at each stage. Salt the meat before searing and then add salt to the dish before braising.
- Be SURE that the lid is on tight. If you are using aluminum foil instead of a lid, make sure it is secured tightly and doesn’t flip off when transferring to the oven.
Watch Me Make Chicken Breast in a Pan
Can You Give Me a Hand?
Please leave a 5 STAR comment in the comment section below. This helps others to find the recipes at Loaves and Dishes!
- 2 lbs chicken breast
- salt and pepper to taste
- 1 tbs steak seasoning optional
- 2 tsp vegetable oil
- 1 medium onion Cut into thin slices
- 1 tbs garlic minced
- 8 oz mushroom fresh sliced
- 6 oz olive slices, drained
- 1 tsp broth concentrate
- 2 cups water
-
Preheat the oven to it’s lowest setting but not less than 170 degrees.
-
Using a meat pounder/mallet, pound the thick end of the breast to the same thickness as the thin end of the breast.
-
Season the meat with salt, pepper and steak seasoning (or your preferred seasonings).
-
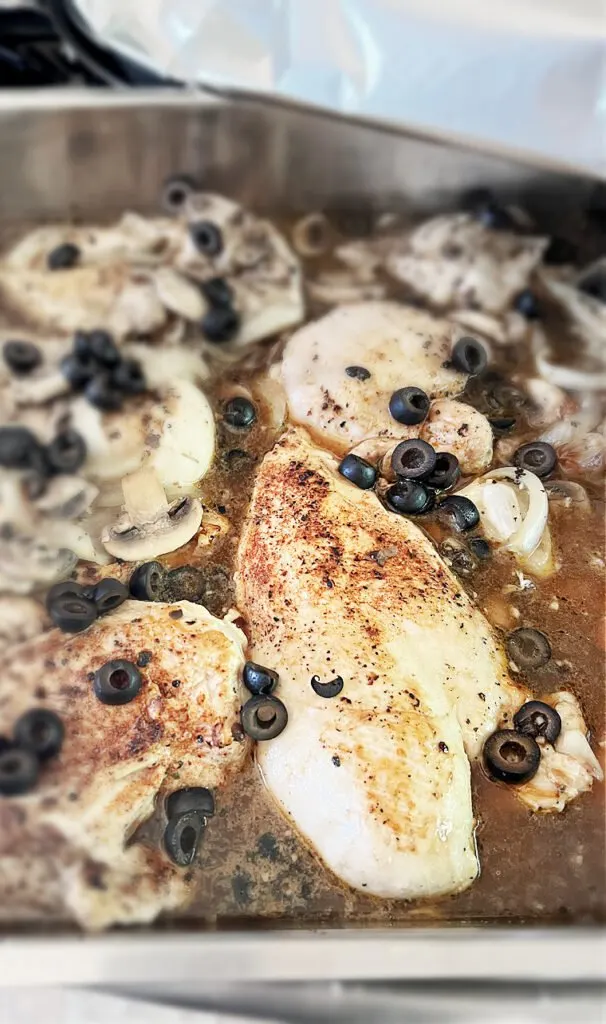
In an oven safe plan (or skillet), heat the vegetable oil (don’t use more than stated) over high heat. When the pan is VERY hot, swirl the oil around the pan and add one breast to one side of the pan and add another breast to the other side of the pan. The breast will sizzle and steam and smoke and generally make a lot of noise and fuss. This is exactly what you want. Leave it alone. Let sear on this side for 2 minutes. Using tongs or a spatula, flip the breast and allow to sear on the other side for 2 minutes. The breast should be somewhat brown on the outside and raw on the inside.
-
Remove the seared breasts to a plate. Turn the heat down to medium and add the onions, some salt and pepper and allow to cook. As the onions begin to soften, add the garlic, mushrooms and the drained olives. Allow to heat until the mushrooms start to soften and begin to lose their water.
-
Add the broth concentrate (read the notes below for information regarding substitutions) and the water to the pan and mix well. When concentrate has dissolved, add the breasts back to the pan and put the lid on tightly. If no lid is available, add aluminum foil and seal down to the pan as securely as possible.
-
Place the covered pan on the middle rack in the center of the oven.
-
Cook for 20 minutes and check the thickest part of the chicken with an instant read thermometer. If reading 165, remove from the oven. If less than 165, reseal the pan and allow to cook for another 10 mins. Repeat until temp of 165 is reached.
-
When 165 is reached, remove the chicken from the oven, remove the lid from the pan and using a large spoon to dish the juices over the top of the chicken. Serve hot.
- Chicken Breast – You can substitute any cut of chicken for this dish but you may have to adjust your cooking time. Regardless, the chicken is done when an internal temp of 165 is reached. Check the thickest part of the chicken.
- Broth Concentrate – You can substitute chicken broth for the water and concentrate. Equal amounts.
- Olives – if you don’t like olives, just leave them out.
- Mushrooms – if you don’t like mushrooms, just leave them out. Feel free to substitute some other veggies like carrots or tomatoes which will give a whole different flavor.
- Onions – If you don’t like onions but don’t mind the flavor of onions, then leave them in, you don’t have to eat them but they do add a lot of flavor. If you don’t like the flavor of onions, leave them out but use more garlic instead.
- Garlic – What? You don’t like garlic? That’s so negative. JK. Leave it off if you don’t like it.
Notes
- The very best tip is to make sure you are using a very good thermometer. The chicken is done when a thermometer placed in the center of the meat at the thickest part is reading 165. Remove from the heat, remove the lid and allow to rest for a few minutes.
- If you can find farm fresh, never frozen and not injected with saline chicken breasts, you’ll have the most amazing flavor that you can imagine.
- You can use any combination of vegetables that you prefer, just know that the veggies will mostly disintegrate. I like to just use onions, garlic and then add my own seasonings.
- This technique will work for any cut of chicken (bone in or out) the most important part is that you watch the temp and when the chicken reaches the right internal temp, remove it from the heat.
- Add salt at each stage. Salt the meat before searing and then add salt to the dish before braising.
- Be SURE that the lid is on tight. If you are using aluminum foil instead of a lid, make sure it is secured tightly and doesn’t flip off when transferring to the oven.
Nutrition Facts
Easy Braised Chicken Breast
Amount Per Serving (0.5 lb)
Calories 356
Calories from Fat 117
% Daily Value*
Fat 13g20%
Saturated Fat 2g10%
Trans Fat 0.03g
Polyunsaturated Fat 2g
Monounsaturated Fat 7g
Cholesterol 145mg48%
Sodium 1076mg45%
Potassium 1147mg33%
Carbohydrates 8g3%
Fiber 4g16%
Sugar 2g2%
Protein 51g102%
Vitamin A 262IU5%
Vitamin C 6mg7%
Calcium 82mg8%
Iron 8mg44%
* Percent Daily Values are based on a 2000 calorie diet.
In my day to day life, I think I always remember that love is patient and kind, but I often forget that it also…
1 Corinthians 13:7
It always protects, always trusts, always hopes, always perseveres


